Step 1 Create the ubuntu environment
The minimum hardware requirements below are suggested for a new DATIM4U implementation. Requirements will be highly dependent upon how you intend to use the DATIM Global implementation and the amount of data being stored and processed.
Quad core CPU
32 GB Memory
At least 500 GB of disk space
Ubuntu 14.04 64-bit
Internet access
- It is also recommended that the installer consider the time zone setting. The DATIM-Global system uses UTC.
- Ports to be open
Add credentials for developers or support personnel who need sudo access to the box.
certificates????
Step 2 Install software
Depending upon the need for the environment (testing, production or other need), the installer will need to determine which versions of the OpenHIM and OpenInfoman packaging to install.
2.1 Add software repositories
Using the following commands, add the necessary software repositories.
sudo add-apt-repository ppa:webupd8team/java
sudo add-apt-repository ppa:openhie/release
sudo apt-key adv --keyserver hkp://keyserver.ubuntu.com:80 --recv EA312927 (Mongodb key)
sudo echo deb http://repo.mongodb.org/apt/ubuntu trusty/mongodb-org/3.2 multiverse | sudo tee /etc/apt/sources.list.d/mongodb-org-3.2.list
sudo apt-get update
sudo apt-get install nginx
sudo wget -P /usr/share/ohie-datim-global/ https://dl.eff.org/certbot-auto
sudo chmod a+x /usr/share/ohie-datim-global/certbot-auto
sudo /usr/share/ohie-datim-global/certbot-auto certonly --webroot -w /usr/share/nginx/html -d servername
sudo apt-get install libxml2
sudo apt-get install libxml2-dev
sudo apt-get install  oracle-java8-installer
2.2 Install OpenHIM
sudo apt-get install openhim-console
- Host - globalservername
- Port - 5008
2.3 Install OpenInfoman
sudo apt-get install openinfoman
sudo apt-get install openinfoman-datim
External url - https://yourserver:8443
Step 3 Configure software
3.1 nginx configuration
Create/Edit Config files in Nginx
For openhim-console, edit /etc/nginx/sites-available/openhim-console
# Site config for the OpenHIM-console
server{
        listen 80;
        return 301 https://$host$request_uri;
}
server {
        listen 443 ssl;
        ssl_certificate /etc/letsencrypt/live/yourglobalserver/fullchain.pem;
        ssl_certificate_key /etc/letsencrypt/live/yourglobalserver/privkey.pem;
        ssl_protocols TLSv1 TLSv1.1 TLSv1.2;
        ssl_prefer_server_ciphers on;
        proxy_connect_timeout       36000;
        proxy_send_timeout          36000;
        proxy_read_timeout          36000;
        send_timeout                36000;
        root /usr/share/openhim-console;
        index index.html;
        location / {
                try_files $uri $uri/ =404;
        }
        large_client_header_buffers 4 32k;
}
For openhinfoman, create /etc/nginx/sites-available/openinfoman
server {
        listen 8443 ssl;
        ssl_certificate /etc/letsencrypt/live/yourglobalserver/fullchain.pem;
        ssl_certificate_key  /etc/letsencrypt/live/yourglobalserver/privkey.pem;
        ssl_protocols TLSv1 TLSv1.1 TLSv1.2;
        ssl_prefer_server_ciphers on;
        proxy_connect_timeout       36000;
        proxy_send_timeout          36000;
        proxy_read_timeout          36000;
        send_timeout                36000;
        location / {
                proxy_pass        http://127.0.01:8984;
                proxy_buffering   off;
                proxy_set_header  X-Real-IP $remote_addr;
                proxy_set_header  X-Forwarded-For $proxy_add_x_forwarded_for;
                proxy_set_header  Host $host;
                proxy_set_header  X-NginX-Proxy true;
        }
        large_client_header_buffers 4 32k;
}
- sudo ln -s /etc/nginx/sites-available/openinfoman /etc/nginx/sites-enabled/openinfoman
3.2 OpenHim Configuration
3.2.1 Setting up OpenHIM administrator alerts
It is recommended that implementers configure their system to alert systems administrators when transactions fail to exchange. Directions to configure this can be found here: OpenHIM User Guide -> Alerting and Reports -> Failure Alerting.
3.2.2 Setting up the OpenHIM Certificate
Depending upon how you obtained your certificates, the certificate files may end in .pem, .crt, .cer or .der. Also note that the administrator will need to ensure that the certificate expiration dates are managed. When the certificate expires, the administrator will need to exchange certificates again. To install certificates from a CA to replace the self-signed certificates generated during installation, perform the following steps:
We support Chrome for the installation and configuration process. The steps for 3.2.2.1 vary significantly when using different browsers as the browsers view the OpenHim as the browsers view the newly installed application as coming from an unverified source until the actual certificate is installed in the OpenHIM. Also we recommend performing Step 3.2.2.1 in an incognito mode.
3.2.2.1 - Login to OpenHim by going to http://GlobalDNSName. (where GlobalDNSName is the DNS name).
Default credentials are: root@openhim.org/openhim-password.
Note: If prompted, click on the "Advanced" (in grey) link, then "proceed..." link. The first time you login you may get the following screen:
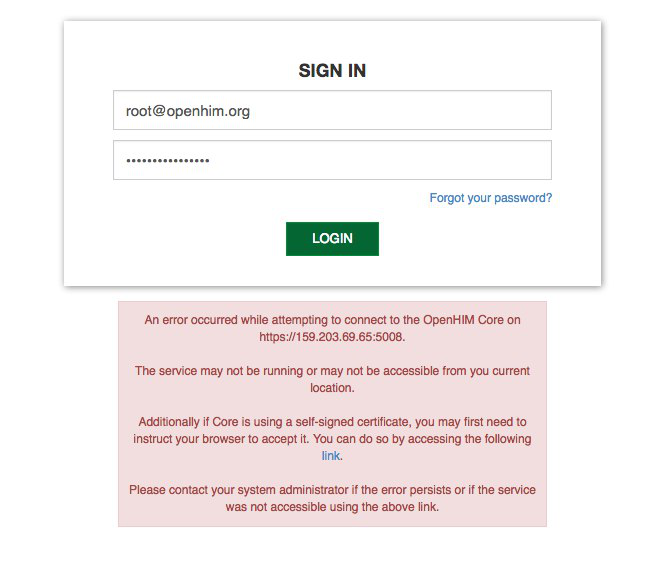
This occurs because our installation certificate is self-signed. These and other issues may occur in Safari and Firefox browsers. Follow instructions given on the error message.
3.2.2.2 Click on the "link" in the dialog, a new page will open, click on the "Advanced" (in grey) link, then "proceed..." link. Once the certificate is accepted navigate back to the log in page and sign in again.
Note: If you continue to have issues, you may ask your browser to ignore certificate errors. The steps to do this differs from operating system to operating system. You may also accomplish this by starting your browser with the '--ignore-certificate-errors --test-type’ flag. This can be done by changing chrome properties via chrome (right click) -> properties -> edit 'target' field to add the aforementioned flag.
3.2.2.3 - When logging in, a prompt will appear to change your password. Follow the on-screen directions to complete these steps.
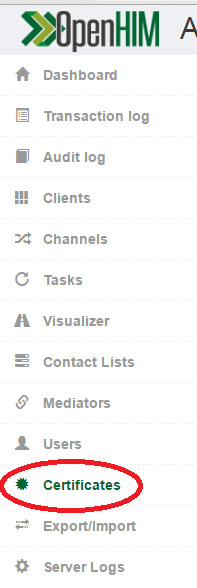
3.2.2.4 - After successful login, on the left sidebar menu, select Certificates to display the certificates interface.
3.2.2.5 - Using the directions on screen, upload your machines's certificate and key. Please note that for "certificate expiration date", -1 does not indicate "never".
The common name should be the DNS of your server or include a wild card that includes your DNS. For example, www.DNSNAME.ohie.org. (where DNSNAME is the DNS name of your node).
Note: If your certificates were generated by the script and you are running that on a remote server then you could get the certificates your machine at yourpath location using the following command.
scp user@datim.example.com:/etc/letsencrypt/live/datim.example.com/* /yourpath .

3.2.2.6 - After uploading both the certificate and the key, the OpenHim will verify that the keys match. Note that the system will notify you that the keys will not match until both files are uploaded.
3.2.2.7 - OpenHim will prompt you to re-start the system. Proceed with the re-start.
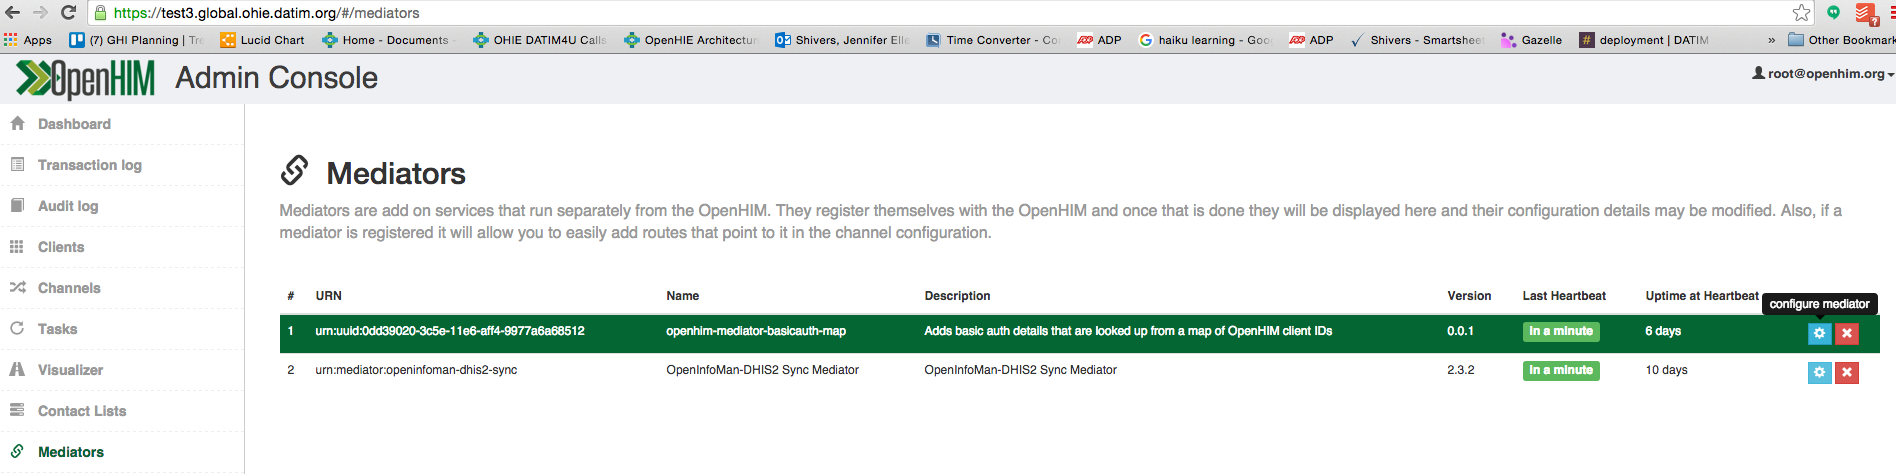
3.2.3 Setting up the OpenHIM Mediators
The following mediators are used by the Global OpenHim:
- openhim-mediator-basicauth-map - Adds basic auth details that are looked up from a map of OpenHim client IDs.
- OpenInfoMan-DHIS2 Sync Mediator - OpenInfoMan-DHIS2 Sync Mediator
- As root
git cloneboth of the mediators to /usr/share/ Copy the openhim-mediator-basicauth-map.conf and openhim-mediator-openinfoman-dhis2-sync.conf from /etc/init/ on the current working global instance to the new instance (this gets the mediator starting up automatically)
# OpenHIM basicauth-map mediator
description "OpenHIM basicauth-map mediator"
# logs to /var/log/upstart/openhim-mediator-basicauth-map.log
console log
start on runlevel [2345]
stop on runlevel [!2345]
respawn
setuid openhim
setgid openhim
script
  export PATH=/home/openhim/.nvm/versions/node/v0.12.7/bin/:$PATH
  export NODE_TLS_REJECT_UNAUTHORIZED=0
  cd /usr/share/openhim-mediator-basicauth-map
  exec bash -c "source /home/openhim/.nvm/nvm.sh && nvm use 4 && npm start"
end script
# OpenHIM openinfoman-dhis2-sync mediator
description "OpenHIM openinfoman-dhis2-sync mediator"
# logs to /var/log/upstart/openhim-mediator-openinfoman-dhis2-sync.log
console log
start on runlevel [2345]
stop on runlevel [!2345]
respawn
setuid openhim
setgid openhim
script
  export PATH=/home/openhim/.nvm/versions/node/v0.12.7/bin/:$PATH
  export NODE_TLS_REJECT_UNAUTHORIZED=0
  cd /usr/share/openhim-mediator-openinfoman-dhis2-sync
  exec bash -c "source /home/openhim/.nvm/nvm.sh && nvm use 4 && npm start"
end script
- Edit the config of each medaitor in /usr/share/openhim-mediator-basicauth-map/config/config.json and /usr/share/openhim-mediator-openinfoman-dhis2-sync/config/default.json to have the username and password of the OpenHIM root user and ensure the port for the api is correct (5008)
- run
sudo start openhim-mediator-basicauth-mapandsudo start openhim-mediator-basicauth-map - View the log files for the mediator in /var/log/upstart/ to see if they started correctly.
# as openhim user
sudo su openhim
nvm install 4
exit
# now as root
sudo su
source /home/openhim/.nvm/nvm.sh
nvm use 4
cd /usr/share/openhim-mediator-openinfoman-dhis2-sync
npm install
npm run prepublish
restart openhim-mediator-openinfoman-dhis2-sync
cd /usr/share/openhim-mediator-basicauth-map
npm install
restart openhim-mediator-basicauth-map
- Create a user with email mediators@openhim.org and assign it a password
- Ask maurya to ssh in to test3
- edit /usr/share/openhim-mediator-basicauth-map/config/config.json and add the username and password that you just created
- edit /usr/share/openhim-mediator-openinfoman-dhis2-sync/config and add the username and password that you just created
- After that you may need to restart the mediators with:
sudo restart openhim-mediator-basicauth-map
sudo restart openhim-mediator-openinfoman-dhis2-sync
The medaitor should now go green on the mediators page on the OpenHIM
To install these????
3.2.4 Setting up OpenHim Channels
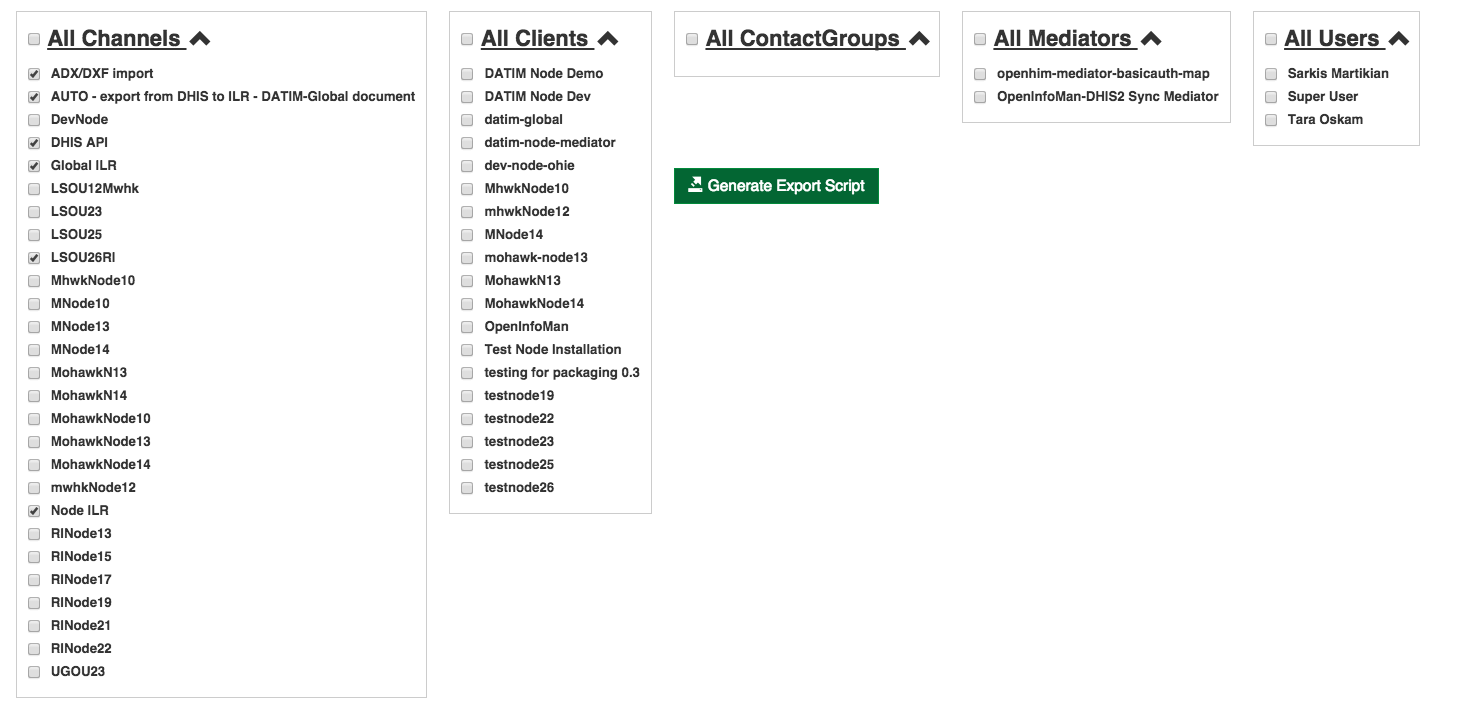
The following channels are used in the DATIM-Global transactions:
- ADX/DXF Import
- DHIS API
- Global ILR
- Node ILR
- AUTO - Export from DHIS to ILR DATIM-Global document
To set up the channels you can export the base channel configuration from an existing global instance by using the export page to select the channels you want to configure (depicted below). Then you can select generate export script. This can then be imported into your new system.
3.2.5 Setting up Global OpenHim Clients
The following clients need to be included
- datim-global
- openinfoman
 to add a new client with the following configurations:
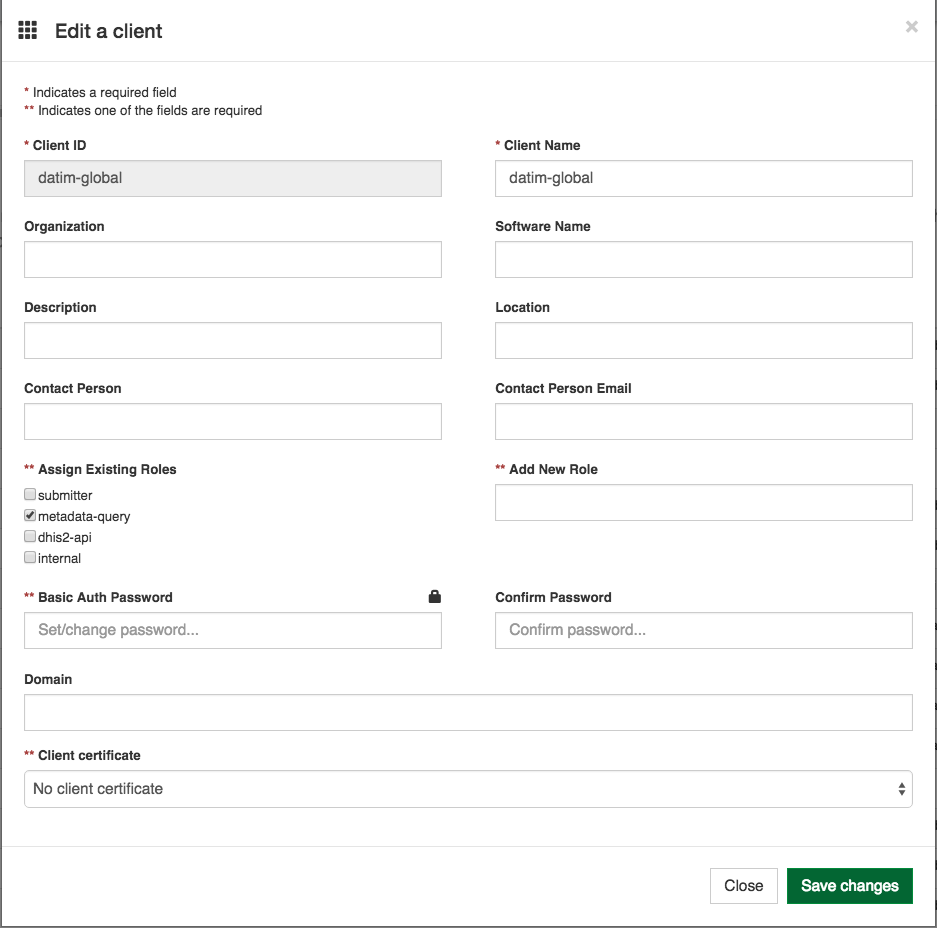
to add a new client with the following configurations:

3.3 Infoman Configuration
The Infoman will need to be configured to have the following documents:
- A DATIM-Global document - This document contains all of the sites extracted from the Global DHIS2 system. (This document is not currently being used for the UG implementation)
- A DATIM-FactsInfo document - This document is refreshed by a chron job that populates each night with the latest mechanisms.
- XXOU-Extract documents for each OU that will be using the system. - These documents will contain sites that are extracted from the DATIM-Global document. These should be the lasted update of the information and are used for a one-time load of site data into the XXOU node.
- XXOU-Managed documents - These documents are cache documents that are refreshed from XXOU-Manged documents on each node and used to provided updated site information being managed at the OUs to the Global DHIS2 system.
3.3.1 Create DATIM-Global document - Need help with this. Not Being Used for Current UG Implementation
3.3.2 Create Extract documents for each OU node that need to work with this global instance - Not Being Used for Current UG Implementation
For each OU node that needs to work with DATIM-Global, there needs to be an extract document that contains the current OU country data that will the the source for seeding the node with their DATIM4U sites.
To create the documents use this command: curl -sL -o /dev/null --data "directory=XXOU-Extract” -X POST http://localhost:8984/CSD/createDirectory
3.3.3 Populate Extract documents - Not Being Used for Current UG Implementation
To populate each extract document, use these directions: https://wiki.ohie.org/display/resources/How+to+Configure+DATIM+Global#HowtoConfigureDATIMGlobal-ManuallypopulatingtheXXOU-Extractdocument
3.3.4 Create FactsInfoDocument
Increase Timeout and allowed size in nginx.conf
Step 4 - Add Nodes as trading partner
To add nodes as trading partners' follow the following directions for adding a node as a trading partner for each node that this global system will be exchanging data with.
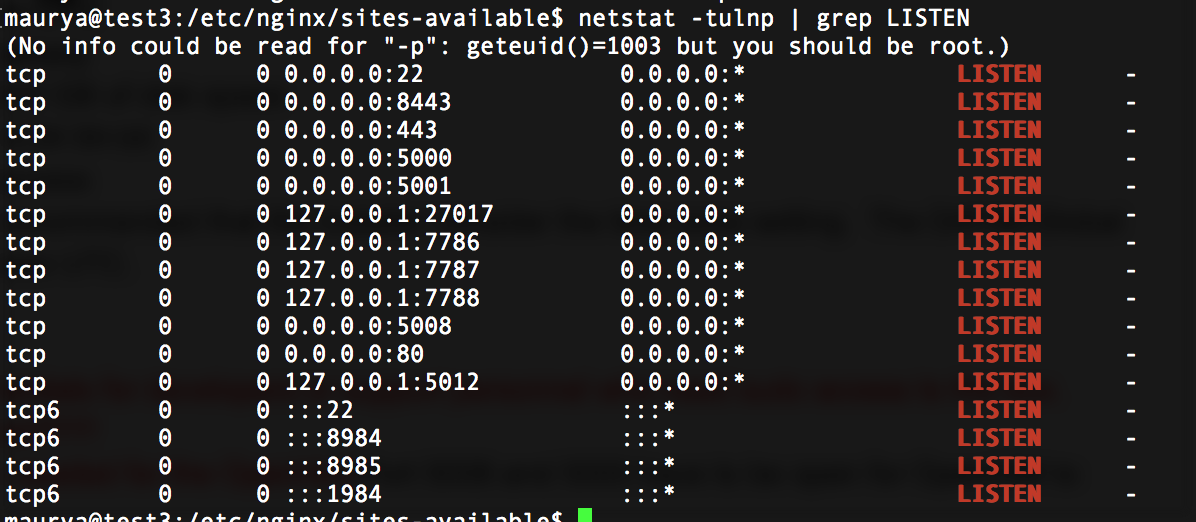
Debug Commands -
- Netstat -lntu (to check open ports)
- sudo dpkg-reconfigure openinfoman - to reconfigure openinfoman
- sudo tail -fn 100 /var/log/upstart/openhim-core.log
Step 5 - Configure ADX Trading Partner Credentials
5.1 Create credentials for ADX Submissions
To set up the ADX transactions, you will need to create a DHIS2 Account (for ex - system_ug_import is used for Uganda) for importing ADX information in the global DHIS2 system. The DHIS2 Account will need Data Entry SI and Data Exchange roles.
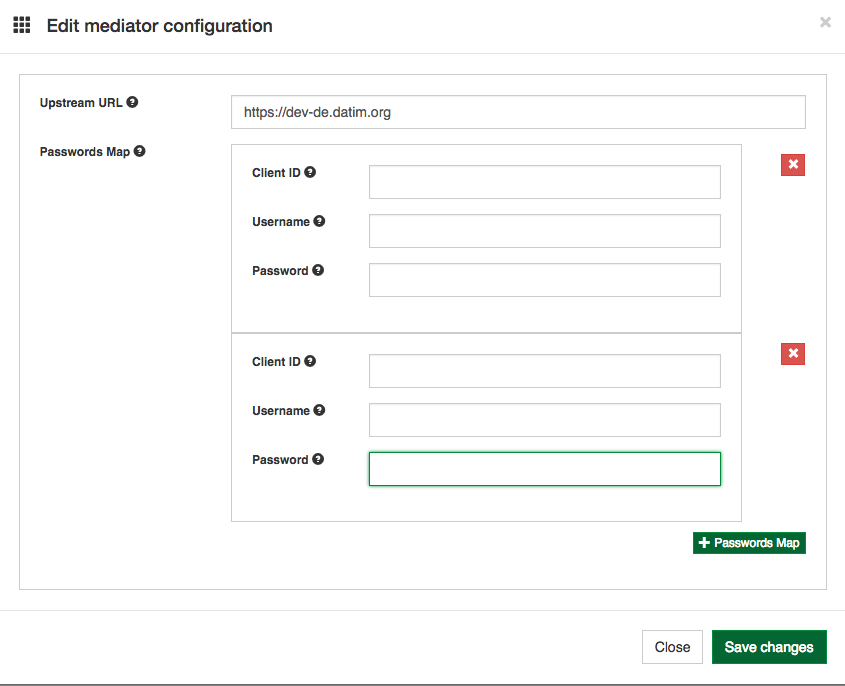
5.2 Map Credentials to the OpenHIM transaction
Once the credentials are created in the global DHIS2 system, they need to be mapped in the OpenHIM.
- Log into the global OpenHim.
- Select Mediators from the menu on the left.
- Select the blue gear for openhim-mediator-basicauth-map
4. Configure the mediator for each node that will be sending ADX messages as follows:
Client ID - This is the node's client id that has already been configured in the OpenHIM. Get this from the Client menu. An example might be "lesotho-DATIM4U"
Username - This is the DHIS2 user name for the account that will be used for that client.
Password - This is the DHIS2 password for the account that was entered in Username.
5. Select "+ Passwords Map" to configure additional nodes.